Consider a scenario where when you plugged in one or more than one external device on your Windows 10 system and the media files within in gets started automatically without any permission message. You may not know what is going to play and this can be a cause of embarrassment if you are with others. Also, playing multiple files simultaneously would create a sense of annoyance and disturbance to users even if he is the only one at the premises.
By putting up that scenario, we meant to describe the users that Windows 10 includes a feature namely “AutoRun” which is enabled by default and runs media files automatically as soon as any external device like USB drive, pen drive, hard disk drive, memory card, etc. is logged into the system. AutoPlay feature is a subsidiary of the AutoRun feature which is turned ON by default in Windows 10 system and allows automatic running of media files on connection with the external devices.
Purpose of AutoRun in Windows 10
The main purpose of AutoRun is to provide automatic software response to hardware actions that you start on a computer. AutoRun has the following features:
- Double-Click
- Contextual Menu
- AutoPlay
Above features are generally called from removable media or from network shares. During AutoPlay, the Autorun.inf file from the media is parsed. This file specifies that which commands the system runs. Many companies use this functionality to start their installers.
But sometime commands get started automatically without any permission message which is very annoying for the user.
This “AutoRun” feature setting can be controlled manually by the users and we are going to learn this in this help article further.
Different Manual Ways to Disable AutoRun in Windows 10
We have some manual tricks or procedure adopting which users can disable AutoRun feature in their Windows 10 system.
Now, let us move on to know the included processes to disable AutoRun in Windows 10 systems.
Using Windows 10 Settings
Follow the below provided instructions one after another.
- Press the Windows key or click on the Windows icon on your Windows 10 system.
- On the search bar, type Settings and then click on the Device Settings on the search results.
- Click on AutoPlay option from the left panel.
- Go to the toggle switch against Use Auto Play for all media and devices and turn it to OFF state.
Another way to do this is by typing AutoPlay in the search box of the Windows. Click on AutoPlay Settings option. Then on the AutoPlay page, turn off the toggle switch for Use AutoPlay for all media and devices. It is also recommended to select Take no action option from the dropdowns for both Removable drive and Memory card sections.
Using Control Panel in Windows 10 also, you can set the AutoRun feature settings. Open the Control Panel on your system, click on Hardware and Sound section from the left panel, then from the right panel, click on AutoPlay option. The new AutoPlay page will get opened. Here, unselect the checkbox saying Use AutoPlay for all media and devices. You can also change the Removable Drive settings as explained above from the same page. Finally, click on Save to save the settings and reboot your Windows 10 system once.
Note: Other choices of actions under Removable drive section are Open folder to view files (File Explorer), Ask me every time and Configure storage settings (Settings); for Memory card section, other options are Import photos and videos (OneDrive), Import photos and videos (Photos), Pay (Windows Media Player), Open folder to view files (File Explorer) and Ask me everytime.
Using Windows Registry Editor
Perform these steps to disable AutoRun via Registry Editor on Windows 10.
- To open the Registry Editor of your Windows 10, type “regedit” in the Run box opened by pressing Windows button and R together. Then click on OK.
- Now navigate to this path in the opened Registry Editor page.
HKEY_CURRENT_USER\Software\Microsoft\Windows\CurrentVersion\Policies
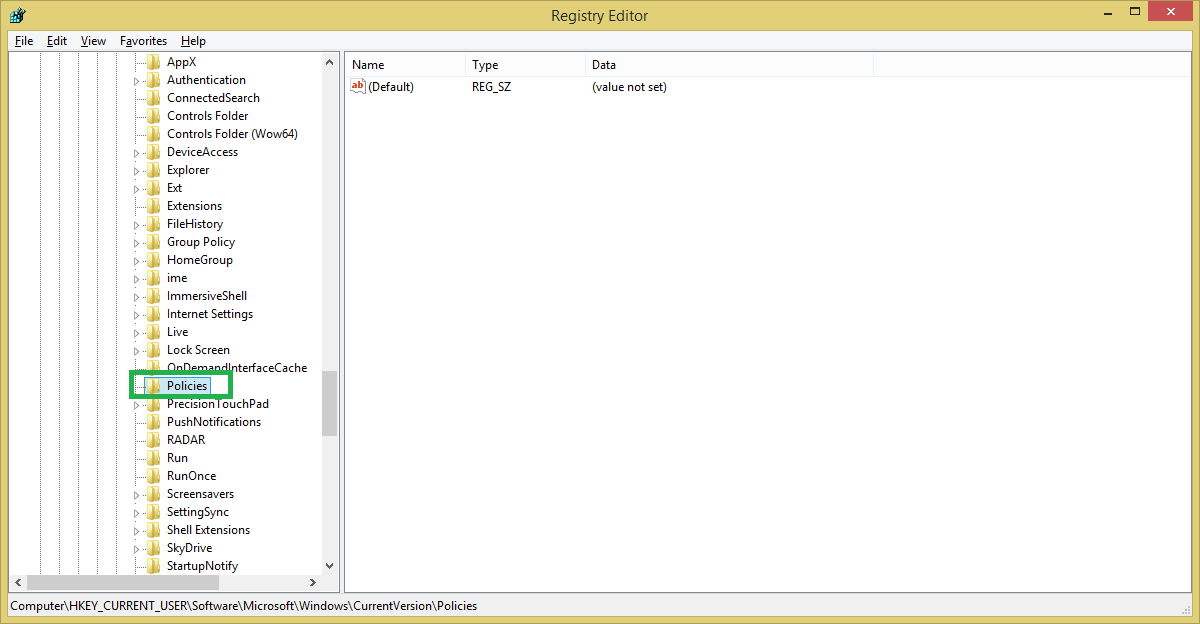
- Click on Policies option on the left panel and then on the right-panel, right-click the mouse and select create DWORD value. Name this to NoDriveTypeAutorun and then select Edit option after right-clicking on it. Now, you need to add a value from the following list as per your requirements of disabling the desired programs. Please check this list.
Value To Disable 1 AutoRun on unknown drives 4 AutoRun on removable drives 8 AutoRun on fixed drives 10 AutoRun on network drives 20 AutoRun on CD-ROM drives 40 AutoRun on RAM disks FF AutoRun on all drives 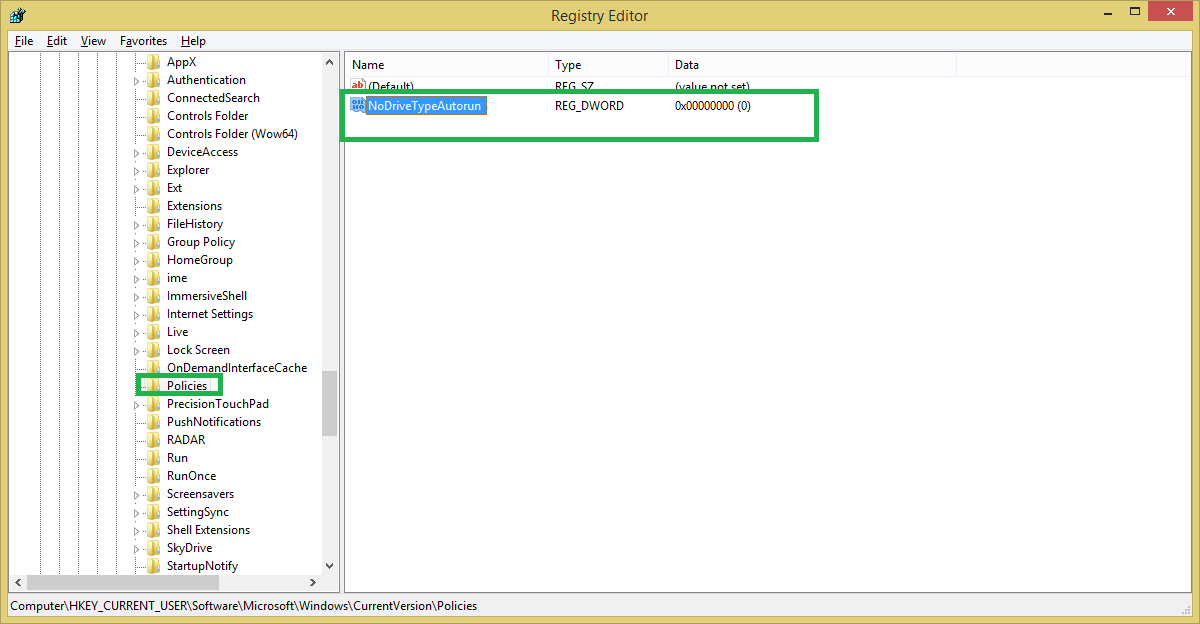
- After providing the value, close the Registry Editor and restart the Windows 10 system.
Using Windows Group Policy Editor
Group Policy Editor can be accessed or processed by the administrator only, so user must be the Windows Administrator for performing this process. With this medium, you can have control over the settings on AutoRun as well as AutoPlay together at a more concentrated level. Let us know the process.
- Start your Windows system and click on Windows icon. Now type gpedit in the search box and then click on Edit group policy option.
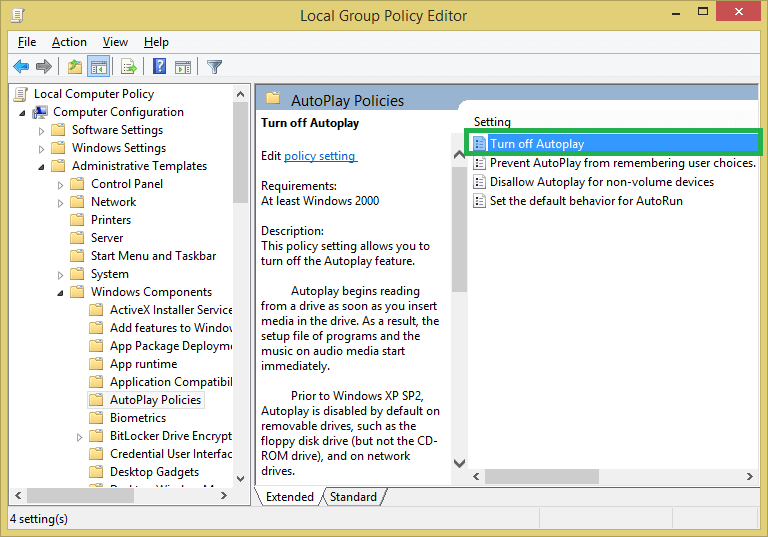
- It will open the Local Group Policy Editor window. Here, navigate to Computer Configuration>Administrative Templates>Windows Components>AutoPlay policies.
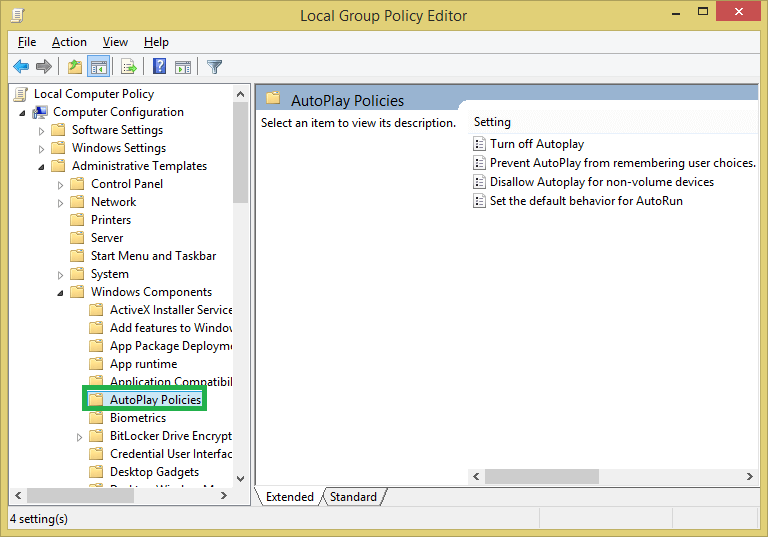
- On the right panel, under Settings section, open Turn off Autoplay option by double-clicking on it.
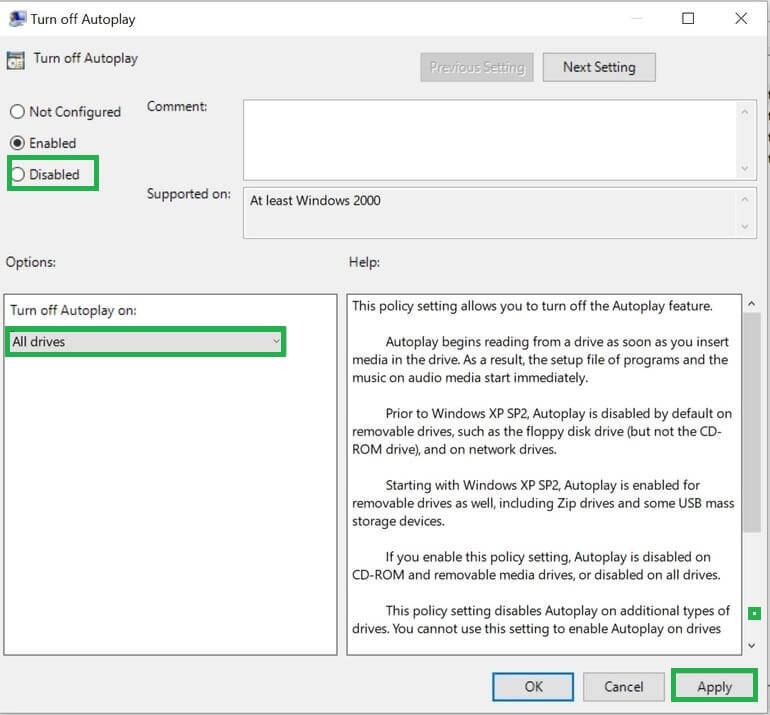
- Now, under Turn off Autoplay, select Enabled option. Next, go to the Options section below it; choose the policy from the drop-down list. The default chosen policy is All drives. After selections, click Apply option.
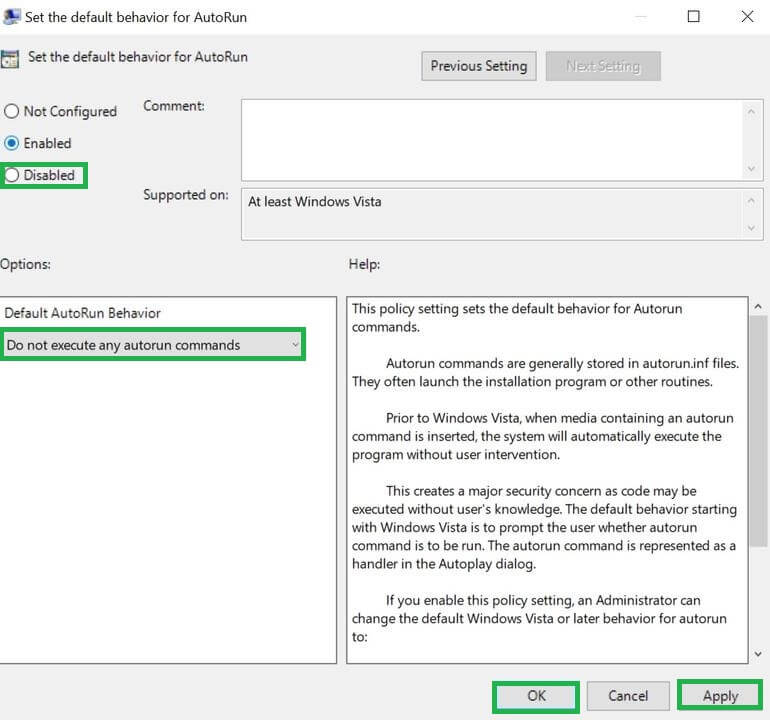
- Next click on Set the default behavior for Autorun and select Enabled option and under Options section, select Do not execute any autorun commands. Then click Apply option to apply these settings.
All the above manual settings and procedures to disable AutoRun and AutoPlay in Windows 10 can be performed by users easily if followed each step carefully. These solutions also require administrator rights to the Windows 10 users for controlling the default AutoRun and AutoPlay settings on Windows 10 systems. One can completely disable this feature but choosing Ask me everytime action for Removable drive and Memory card is also the right choice for the users.
If you have another issues related to data loss due to hard drive corruption, system files corruption, etc., we suggest you to try the most famous Windows Data Recovery tool for recovering deleted or lost files from system drive. It scans all drives completely for a smooth data recovery and works for all Windows Operating System versions.
End Words
We helped users with multiple manual ways to control settings of AutoRun and AutoPlay feature in Windows 10 systems to specify actions when any external drive is connected to the system. A special introduction of data recovery tool from Windows is brought out for the users. For recovering of small data lost, you can try best free data recovery software.

