Microsoft Outlook offers much more than simply storing and exchange data between different users. One useful feature “Category color” is one of the intelligent integrated options
in the Outlook application to manage emails within it. Users can assign desired color category to a set of emails or items for a related groups like notes, appointments, email messages, calendars, contacts, etc. for the ease of identification so that you can quickly track and organize them. Adopting this option in the Outlook emails can easy your search efforts with assigned color category that differentiate different Outlook folder groups and thus helps in improving productivity and efficiency of work. You can view these Category colors in table views easily.
There are multiple options to use these Color categories to your Outlook data. You can use the default category colors, create the new ones or rename the older ones. Its upto your choice as Outlook provides customization over this feature. And one must know that this Category Color feature is not provided for the IMAP accounts configured in the Outlook application. There is no such facility for IMAP configured accounts in the application.
Moving on, let us know how you can use this feature for your Outlook data in brief.
Uses of Color Category in Outlook Application
Please acknowledge some of the smart uses of the Color Category feature in the Microsoft Outlook application.
Assigning Color Category
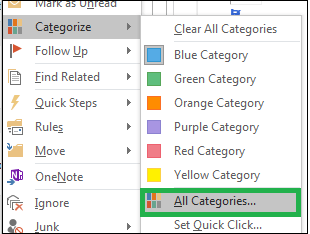
You can assign a color category to a single email by right-clicking on it and selecting the option Categorize and choosing the desired color for it. Or you can perform it by opening the email message and then navigating Tags>Categorize. From the drop-down, choose the desired category, color, shortcut key and assign it. If you want to view all the categories, click on All Categories option. Choose the desired color and assign it.

Creating Color Category
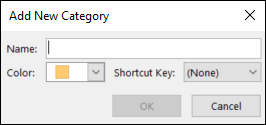
As mentioned earlier, you can create a color category of your own. For emails, you can find All Categories option within the opened email while for calendar, you need to navigate to Appointment/Meeting tab and then click on the Tags group. After clicking on the All Categories option, click New in the Color categories dialog box. Provide a name for this new category, choose the desired color and add a shortcut key, if you want to. Finally, click OK. A new Color Category is created which you can assign anytime to your Outlook items.

Renaming Color Category
Renaming any color category is as simple as you rename any file or folder. Just reach to the default or newly created color category via Categorize option, select it and click on the Rename option. Add the desired name for the color category, color, shortcut key and thus it is now identified by this new name.
You can also assign more than one color category to each items. Only 15 recently used color categories appear on the Categorize menu. If you want to see the rest color, click All Categories on the Categorize menu.
Why and how to resolve common “Category Colors Don’t Display in Inbox” issue in Outlook?
We have explained the use and importance of Color Category feature of Outlook but users sometimes can experience an issue that this category color is not visible or displayed in the Outlook inbox. It refrain users to utilize this feature and further result in annoyance among them as category color cannot be seen. Sometimes, in such condition, you can view the color after opening the whole message for reading but out of that, within the inbox folder, it is not visible.
Reason: The reason behind this situation can be shifting of the CATEGORIES column to the right of the FROM field in the emails list under Inbox folder of Outlook. This arrangement of the columns is the reason behind the color display blocking of the assigned color category emails. This generally happens by the users’ interference whether knowingly or unknowingly.
Solution:
Method 1- By Modifying “View setting option”
You can correct this mistake by modifying some settings within View Settings option in the Outlook. Let us know this process in steps.
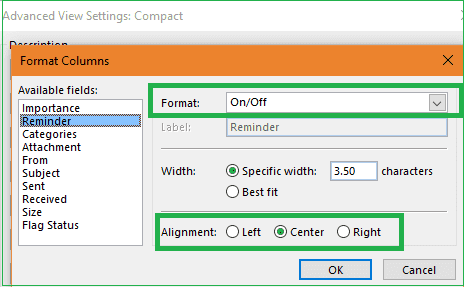
- On the Outlook application, move to the View tab, click on View Settings option and then click on the Format column options.
- In the Format column dialogue box, you need to choose the field just before the Category option and if it is in icon form, select On or Yes option under the Format field, change the width, alignment (if needed) and then finally click on OK.
Note: You can decide the field movement, change format from icon to text, etc. as per your requirement.

- Thus, by modifying the view settings of the fields columns which includes CATEGORIES field as well, this issue can be resolved.
Method 2- Assign “Reviewer” permission by mailbox owner
Category colors only apply to items in your Outlook mailbox. On the other hand if you apply a category color to a meeting request you have received from another user, that color category will only show in your calendar.
In Outlook 2007, the Color Categories are stored within the main Calendar folder of the mailbox user. If you want sharing areas with your Outlook and also want the delegate to be able to see the colors and categories, the mailbox owner needs to assign you at least “Reviewer” permissions. Which includes the Full Details read permission that is required for displaying Color Category in inbox.
Method 3- Build the master category list
If you switch outlook in other computer or if you migrate to newer version of Office or import notes, appointments, email messages, calendars or contacts that is categorized but the color category is not on the master list, colors will be randomly assigned. Due to this category color is missing in mailbox. You need to build the master category list using upgrade to color category. Outlook has a feature that will look for categories assigned and add them to master categories list of user. The method is named ‘Upgrade to Color Categories’ and you can run this by right click on the top level folder and choose Data File Properties from the menu bar. In the Properties dialogue option click the button to Upgrade to Color Categories. Then it will convert the category and add any not already on your master color category list. If you have more than one account in your profile that uses an existing data file, you need to repeat these steps for every account.
We just explained the easy way to resolve the issue “Category Colors Don’t Display in Inbox” using View Settings option in the Microsoft Outlook.
This was the feature related issue which can be resolved using manual settings and procedure as mentioned above. Several Outlook errors are due to corruption in PST file which is the database file of Outlook and which requires a repair tool in addition to perform the repair. Users can try the free inbuilt utility scanPST.exe (Inbox Repair Tool) for fixing minor corruptions in small-sized PST files but for severely corrupted PST files, you can go directly for our reliable PST Repair tool. It supports large-sized PST files with any level of corruptions without causing any hassle. It can repair PST files in very less time and integrates smart filter options. The tool supports every Outlook version. Check out all its important features and the download (trial version) and purchase (full version) link at the website.
Final Words
The blog was all about Color Category feature in Outlook application, its uses and resolution of issue like “Category Colors Don’t Display in Inbox” via View Settings option in the Outlook interface. A smart solution is suggested for users encountering any type of Outlook error due to corrupted PST files.

