OST file deletion is mandatory to reduce disk space. Prior making any such deletion user must take care of the OST files to be deleted because the wrong move could be even costlier. The OST file to be deleted potentially belong to either Outlook platform or Exchange platform. Irrespective of the place of origin, the concerned file can be deleted to save the disk space. The other reason for such deletion is avoiding the customary recovery process and unnecessary waste of money by purchasing the licensed version. If your OST file is corrupted due to interruptions in synchronization with abrupt system shut down, virus infections, oversized file, application errors, faulty add-ins or extensions, etc., it may end up in different errors causing bad synchronization, data inaccessibility, network issues, storage issues, hard drive issues, etc. In such situation, user need to delete OST file and replace with a fresh file.
Deleting Corrupt OST File in Outlook
Therefore, to perfectly deal with damaged OST files and a possibility to wipe out, user is strongly recommended to follow these steps:
- Close all running MS Office applications including Microsoft Outlook.
- Hit Start and select the Run option or press Windows button and R together.
- Enter ‘%APPDATA%\Microsoft\Outlook’ command in Run Window and click OK.
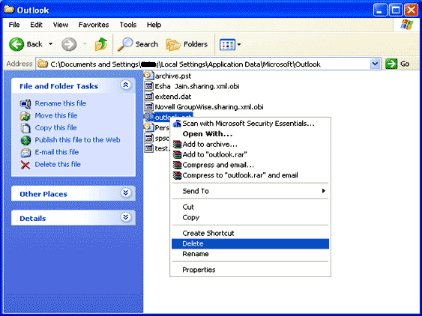
- In the Explorer window, user can select the OST file to be deleted, right-click on it and select the Delete option. This can also be done by using the delete icon that deletes the corrupt OST files permanently.

- Also, ensure that the file is deleted from the Recycle Bin of the system. Empty your Recycle Bin or select and delete OST file from there.
- This is how the concerned OST files can be effectively deleted from the user’s end.
Note: Users can also go to the Control Panel in the system, click on the Mail option. Select Email accounts option next, switch to the Data Files tab, select the Exchange account file and click Open File Location option. It will open the OST file location. First, close the Account Settings and Mail Setup dialogue boxes. Then, right-click the OST file, select the Delete option to delete it and then delete it from the Recycle Bin also.
Deleting OST files as desired is quite witty. However, creating new OST files is easier than ever thought.
Steps to create fresh OST files
- Restart MS Outlook. This time ensure that it is online.
- Due to non-existent condition of the Outlook file, as deletion took place before, a message will get pop up that reads, “C:\Exchange directory\file name.ost” could not be found.
- Hit the ‘OK’ button to close the dialog box displaying the error message.
- Once done, an Offline Folder File Settings will be opened. Click OK to close the dialog box.
- Next, a dialogue box will appear asking to create a new OST file. Click Yes to continue.
- Go to Tools -> Synchronize All Folders.
- A new OST files will be created.
Once this is done, user can use the Outlook in Offline Mode. Once the new OST files get synchronized, the changes made in them get automatically updated whenever the network connection is available.
Note: One disadvantage of the method of deleting corrupt OST file and recreating one is that it will not update or download the unsynchronized data to it which was added before corruption in OST file or by fixing synchronization issue.
You can also reduce the .ost fie size with the help of the Mailbox Clean up feature. Under this feature, click on View Mailbox size option to view the total size of the mailbox and select the OST files/folders and use the Delete option to delete it. Now, navigate to Tools>Account Settings. Select the Microsoft Exchange Server option, click on Change option and then click on More Settings option. Switch to the Advanced tab and click on the Offline Folder File Settings option. On the next page, click on the Compact Now page to compress the size of the file.
To delete OST file, user must try the compaction of OST files. The compaction of OST files also assists in saving the disk space up to some extent. To move into more productive and secure way, it is recommended to convert OST to PST and other file formats and delete the existing files. This makes a sort of back up of the OST files and saves the disk space as well. Try the most efficient Best OST to PST Converter tool for this and get a smooth hassle-free conversion of OST files. You can be selective here about the data by applying advanced filters on the OST mailbox for conversion. The tool does not require availability of any server or email client to perform. It is capable of performing conversion without affecting the hierarchy and structure using simple automated steps. Winding up, it is the best tool for backup of OST file data to PST file format or other desired destination and the recovery of inaccessible OST data. Try it yourself!
- Open or View OST File in Microsoft Outlook 2019/2016/2013/2010/2007
- How to Move IMAP OST file to Microsoft Outlook 2016?
- Fix error 0x8004060c while trying to send/receive email from Outlook
- Free Methods to Import OST Emails Microsoft 365
- Move Offline Outlook Data File (OST) in Outlook 2019/2016/2013


Sometimes you face issues from a corrupted OST file, which is not important for you. I was facing the same situation, and I want to delete these useless OST files. This blog’s method taught me how to delete OST file without any other issues. Thank you for sharing this useful blog.
Corrupt OST files is such a headache and due to this many error occurs. To prevent from this issue I decide to delete them and used above method.
Because of large scale online communication through emails my mailbox updating slow and to remove this issue I have to delete OST file. This blog method shows me simple method to create storage for new mails.
Due to abrupt system failure and oversized OST files I applied this blogs method to eliminate corrupt OST files. Procedure steps are elaborate in easy language. I completed my task successfully, now my system works good and I received my new emails immediately.