The readers are going to learn the only manual method to export Office 365 mailboxes to PST file with eDiscovery feature in Office 365.
Most users perform migration from their regular email clients to Office 365 (cloud environment) attracting towards its features, ease-of-accessibility, data security, data management, etc. But there are times when a user needs to store some data from cloud to an accessible storage, i.e. to export the Office 365 to PST. The prominent way to backup the cloud data is to export Offce 365 data to PST file. This PST file can be later on available to access in the Outlook environment anytime. Also, taking Office 365 data backup adds more security to data than ever for all scenarios.
Common reasons to export Office 365 to Outlook PST file
- For backup and archiving requirements
- Maintaining information flow in case of no internet
- Removing provisions from earlier account users
- Using online data in offline mode
- Keeping Office 365 data as a record, compliance requirement
- Securing online data from online hacking and thefts
If we talk about the native solutions to export Office 365 mailboxes to PST, then there is a single method utilizing the eDiscovery tool from Office 365 interface. In the next segment, we will be discussing the steps needed to use this method to export Office 365 mailboxes to PST file. This method involves a number of steps in continuity as well some technical knowledge is also required along with good concentration and efforts. Let us know the method in more detail.
Export Office 365 Mailboxes to PST with eDiscovery Tool
User performing this procedure must be the administrator or have the administrative rights of Office 365 account and assigned the eDiscovery Management role group. Also, make sure to install the latest version of the Internet Explorer web browser as this tool works best with it and for other browsers, you might require to install an added extension for smooth functioning. Here are the steps given:
- Login to your Office 365 portal with the administrator credentials. Under Apps, click on Admin option.
- Expand this Admin section and then click on Security & Compliance option.
- Within Security & Compliance section, click on Permissions option and then check the eDiscovery Manager option from the list and then click on Edit role group on the right pane side.
- Click on eDiscovery Manager option to add the accounts for which you want to assign the export role.
- Click Add + option and choose the desired accounts from the retrieved list from Office 365 mailboxes. After selection of the mailboxes accounts, click on Done. Then finally click on Save option.
Note: For some cases, the Export role is missing (not set by default). Check and add this role group by clicking the Edit role group option. - Next, navigate to the Search & Investigation section, expand it and click on Content search option. Click on + icon for performing the new search to the content.
- In the opened New search page, provide the name, choose the search location options and then click on Next.
- A new window page will get open. It offers to enter the keywords for searching the content. Users can also add the conditions to narrow their searches. Either enter the keywords or leave it blank to search for the complete content. Click on Search.
- The search process gets completed and now the accounts are also added for export. Click on Start export option on the right panel.
- A page named Export search results for Mailbox Office 365 Migration will get open. Choose the desired options from Include these items from the search and Export Exchange content as criteria. After selecting, click on Start export option.
- The export process will get start and users can download the exported results with detailed information about the complete export procedure by clicking on Download exported results option from the right panel.
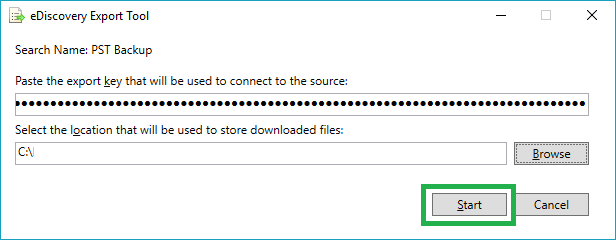
- Export search results page will get open. Here copy the available URL in the export key.
- Paste this URL in the eDiscovery Export Tool, provide a destination path to save this PST file and then finally click on Start. Now, the final export process will get start and complete after some time.

As we can see the number of steps involved in the complete process with each complex step is enough to confuse a non-expert or beginner. The method is time-taking and requires dedication which is quite lacking in today’s IT and digital workers. This eDiscovery feature option requires Office 365 archive license to use it for the export. Keeping them in mind we recommend always the use of automated solution to perform backups and migration. It saves valuable time and efforts of the users.
Our automated export Office 365 to PST tool is the ultimate solution to export Office 365 mailboxes to PST file securely. The data remains secure all the time – before, during or after the exporting. Unlike the manual solution mentioned-above, the exporting of Office 365 mailboxes is performed within maximum 5-6 steps and it also integrates very simple and easy-to-understand user-interface, filter options for its users. The tool has no restrictions over Office 365 plans and Outlook versions. It works with all of them. Most importantly, the backup is reliable, secured and easy with this software. So, give it a try with performing export of Office 365 mailboxes to PST with its free trial version.

