Virtual machine setup has been quite a hit in the overall corporate world due to its obvious advantages. Virtual machines store data in the VMDK files that can be easily seen in the data store of the VM. In many cases, the user needs to extract data from the VMDK files. It can be done using specific methods that will be discussed in this blog. The VMDK file has two types of files “descriptor” and “flat” files. It is important to know that out of these two types flat file contains all the important data that needs to be accessed. On the other hand, the descriptor file contains text data for virtual hardware version and disk geometry, etc.
In this blog, we will look at methods to extract content from VMDK files. The only thing to keep in mind before going ahead with these methods for your use is that these methods will only be for healthy VMDK files and not for damaged or corrupted vmdk file. Extracting data from the damaged or corrupted file is a broad topic itself and will not be covered here. User can also difference between VHD vs VMDK files.
How to extract content from VMDK files?
Firstly, to understand how files are to be extracted we should learn about the saved, seen, and what vmdk file is really about. To view the content of the VMDK file, the only way is to download it. When you try to download the files, you will receive a pop-up asking you to download multiple files. You will be able to see both descriptor and flat-file locally. Now let’s move ahead with the methods of extracting data.
1st Method: Using another VM such as ESXi
It may sound trivial but accessing the content of a VMDK file can be very simple. It doesn’t matter which VM is hosting the VMDK file. Therefore accessing content using another VM such as ESXi or Workstation is completely healthy for the data. It is recommended to copy the vmdk file first before using this method.
- Launch the new host, ESXi in this case, and in the Hosts and Clusters section, select and right-click on the virtual machine for options. Now select the Edit Settings option.
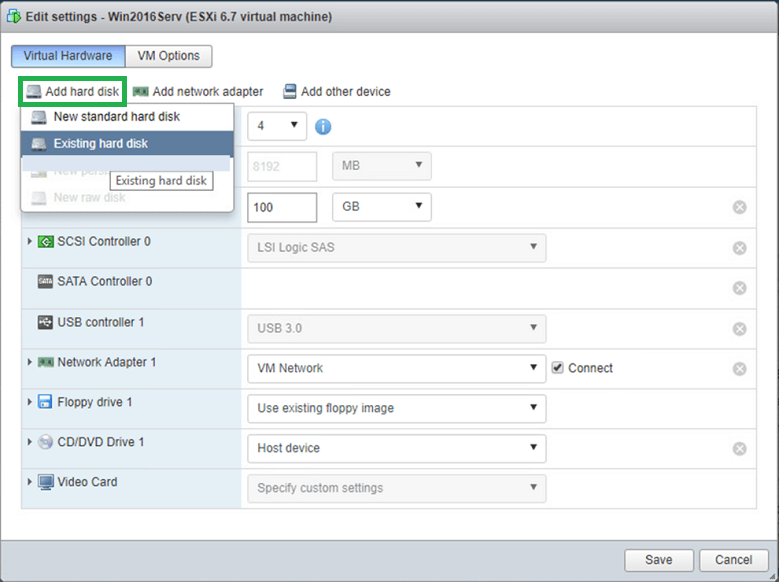
- In the Edit settings wizard navigate the Virtual Hardware tab. Under this tab, select Add Hard Disk and then Existing hard disk.
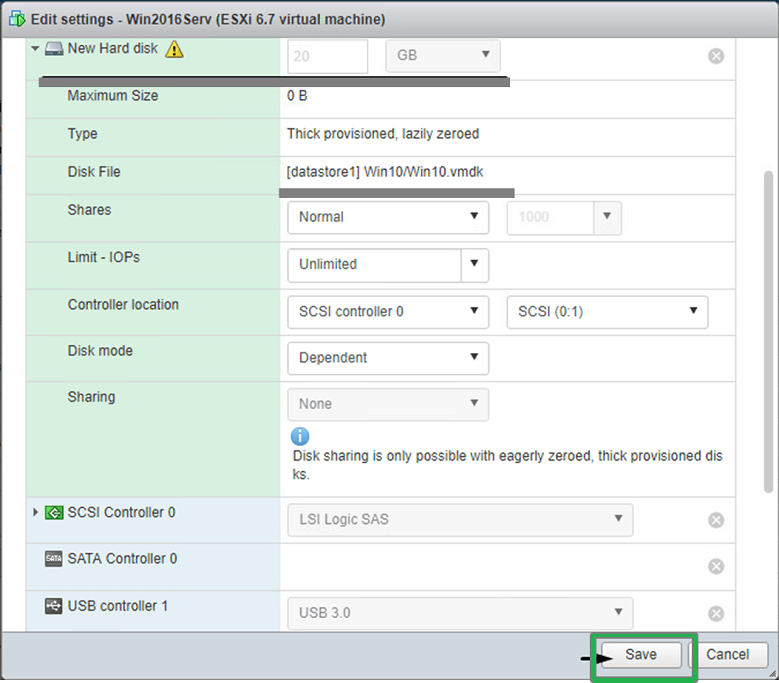
- Provide the path to the VMDK file and click on the Select option. In this case, the disk is located on the same host as the healthy VM. This is not a good practice which is why we have copied and working on the copied vmdk in the first place.
- Click on the Save button after checking all the settings.
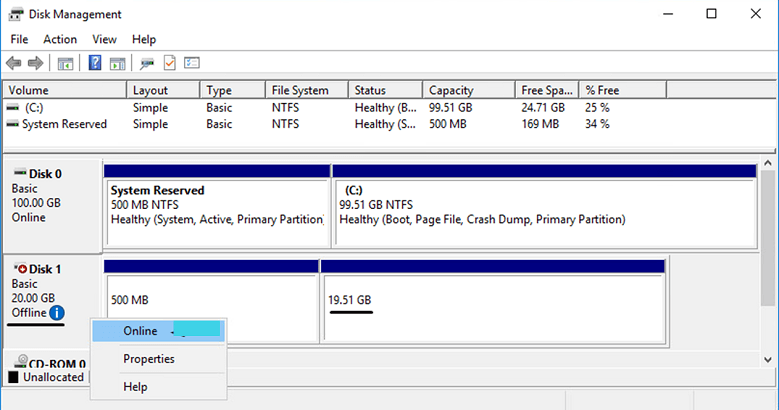
- Now go to Disk Management from Computer Management. Here right-click on the added disk and select the Online option to activate.

- Now the content can be accessed, extracted, and copied easily from Windows File Explorer.
2nd Method: VMware Workstation
- Download, install and launch VMware Workstation on your system. Go to the File menu and select Map Virtual Disks.

- Now click on the Map button.
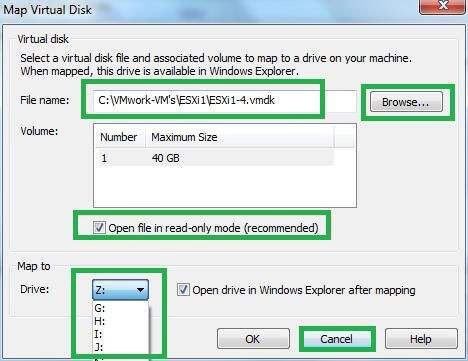
- In the Map Virtual Disk click on the Browse button to search for the vmdk location and select the maximum volume. Then uncheck the box against Open File in Read-only mode, select a letter for drive and finally click OK.
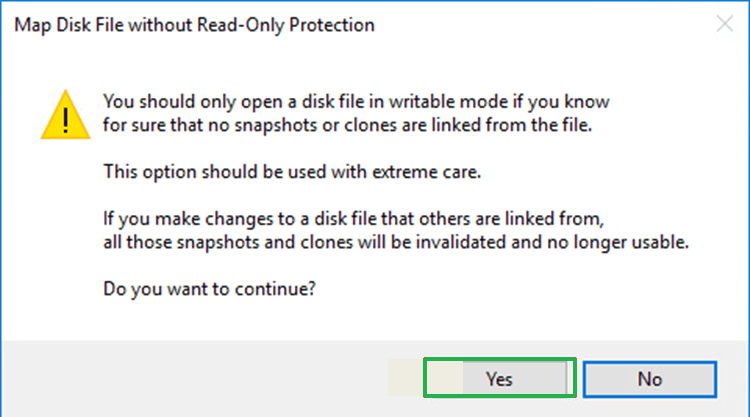
- There will appear a warning message. Click Yes on it and proceed.
- The selected drive will open in Windows Explorer where you can extract files.
- In the final step after extracting now right-click on the file explorer and select Disconnect Virtual Disk.
3rd Method: Using 7-zip software
7-zip is free utility software that can extract almost every type of zip file. This can also be used to extract data from vmdk. It opens the vmdk as archives and you can copy the data files from there to any location on your system.
- Download the VM disk on your system.
- Next, open the larger file, and right-click on it. Then follow 7-zip > Open archive.
- You will be able to see extraction being taken place on the screen. After the files are extracted you can use them.
- After the process is completed close the 7-zip utility.
4th Method: VMware virtual disk development kit
VMware virtual disk development kit has many utilities that can be used for different purposes by developers. The VMware-mount.exe application can be used for the extraction of content from VMDK files.
- First, download the multi-purpose development kit on your system and install it.
- Now launch Command Prompt as an administrator where you will put the following command –
cd C:\Program Files (x86)\VMware\VMware Virtual Disk Development Kit\bin
The path mentioned in this command is the default VMware-mount.exe application storage location.
- Next, run the following command –
vmware-mount.exe /p C:\temp\Win2008Serv.vmdk
- For the final command use –
vmware-mount.exe K: /v:2 /m:w C:\temp\Win2008Serv.vmdk
- You have completed the process and will find the files in the disk drive. The data is ready to use and copy.
- After this, you need to dismount the disk. Use command –
vmware-mount.exe K: /f
for the purpose.
Using third-party tools
With the manual methods, you need to try them one by one to find out which one will suit your needs. And in many cases, it is needed to be known whether the file is damaged or not. This is not the case with third-party tools such as the VHD recovery tool which can extract content even from the damaged file easily. We recommend you use third-party tools for a quick and easy way out of extracting content from VMDK files.
Conclusion
It is important to know which part of the vmdk file contains the important data so that we can focus on that. There are multiple manual methods such as mentioned above that can be used to extract data easily. However, if the user wants the quick and easy way out they can use third-party tools.

