Cloud migration is the most favorite data exchange and storage platform for both big businesses and small scale organizations as it is the safest backup place and also the most cost-effective. Any email client database file just like Outlook for Mac OLM file is unsafe or prone to corruption as OLM file location is at the system folder and not on the web.
The risk of corruption is always there. on the other hand, Microsoft 365 needs only login details and is accessible on any system. It also provides many services to users such as Microsoft Exchange Online, Outlook for Web Azure, SharePoint, Yammer, OneDrive, etc. The cloud platform’s anywhere accessibility is another advantage with large and secure data storage services. The Microsoft 365 platform is also preferred due to its scaling and flexibility in plans, subscriptions and features.
Recently, we got many user queries asking a reliable solution for moving Outlook for Mac data to the cloud account. And, for users currently using or having OLM files and want immediate shifting of its data to cloud location, this blog is going to be helpful. Read and understand the below given solutions to import OLM to Office 365 account.

Recommended: Free Methods to Convert OLM to PST File
Try Manual Solution to import OLM to Office 365/
The native solution to import OLM to Office 365 is indirect, time-consuming one and it is suggested to take a backup of your OLM files before executing this process. Here is the complete explanation of the process.
A. Setting up IMAP account in Gmail and configuring it in Outlook for Mac
First, let us know the required steps to set up an IMAP account in the Gmail application.
Note: If you do not have a Gmail account, you need to create it.
- Sign in to your Gmail account and go to the Settings option.
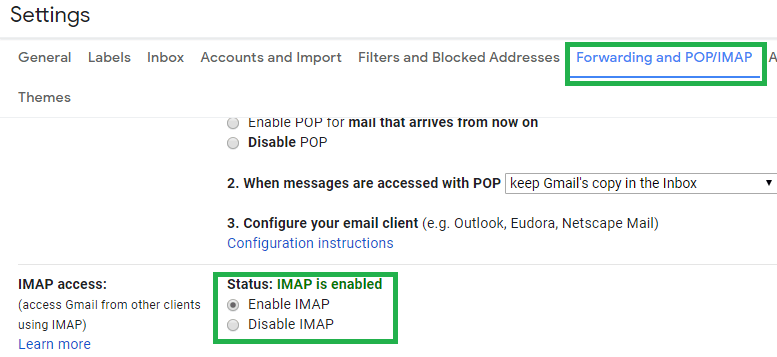
- On the Settings page, switch to the Forwarding and POP/IMAP tab. Then under the IMAP Access section, click on Enable IMAP option.

- Finally, click on Save Changes option to save this setting. The IMAP account is setup.
Now, configure this IMAP account in Outlook for Mac using the below instructions.
- Start your Outlook for Mac application. Navigate to Tools>>Accounts.
- In the opened window, click the + sign to add new account which is the Gmail IMAP account.
- Next, provide the require information about Gmail IMAP account along with user name and password like
Incoming server – imap.gmail.com
Outlook server – smtp.gmail.com
SSL Connection – Check this option - Click on Add Account option. After successful connection, the Gmail IMAP account will get configured with Outlook for Mac.
B. Creating label in Gmail account for synchronizing Outlook for Mac and IMAP account
Users are required to create label in Gmail in order to synchronize and then move OLM file data to the configured IMAP account. Let us know this procedure.
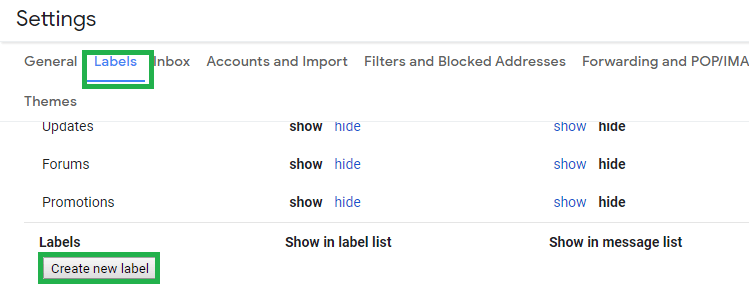
- Again go to your Gmail account and then follow Settings>>Label.
- Click on Create new option to create a new label. Enter a name with nest label info and click on OK. The label is created immediately.

- Now, move to the Outlook for Mac application. Here, click on Send/Receive option so that the synchronization process gets started.
- Wait till the complete data transfer take place.
C. Configuring Gmail IMAP account in Outlook and then moving to Microsoft 365
This is the final stage of this native solution to import OLM to Office 365. You just need to configure IMAP account in Outlook using Account Settings feature of Outlook by adding a new IMAP account using Gmail credentials. Once the Gmail account is configured in the Outlook application, then all the data is available in the Outlook which you can move to the PST folders as well via drag-drop or copy-paste options.
Finally, to import OLM to Office 365, either you can configure Microsoft 365 account in Outlook and then move OLM data to Microsoft 365 mailbox folder or use the cloud Import feature (Network Upload method) to import Outlook data in it by uploading the PST files using Microsoft in-built utility Azure AzCopy tool.
Note: There is another method called as Drive Shipping method to move OLM exported Outlook PST files to Microsoft 365 location. In this method, PST files are copied to a BitLocker- encrypted hard disk and then this hard disk is shipped to the Microsoft 365 physically. After processing the hard disk, the Microsoft personnel would upload PST files on the Microsoft 365 temporary location. All this process completion takes quite a time about one week or more than that which is unfavorable to the users in urgency.
As you can see and also mentioned at the start of the above process that it is a quite long process and also need careful, skilled hands for execution. Any minor mistake at any stage can lead to more complications in the process and then could result in the data loss or failure of migration. Moreover, the manual solution explained above requires two Operating System environments at the same time which is hard at times and the worst, the data integrity of the files or emails can get hampered during the process. These manual solutions are misfit for large scale enterprise migrations.
Try Direct Method – Professional One
We cannot guarantee of the manual solutions for successful OLM data transfer to Microsoft 365 location. So, we have and suggest an automated solution to perform this migration process from Outlook for Mac to Microsoft 365 platform.
OLM Converter tool
It is an efficiently programmed software with robust algorithms having capacity to import OLM to Office 365 through a one-way direct method. The user even does not require Outlook for Mac or Outlook application to execute this process. It includes preview features and multiple filter choices for users to segregate the data for migration. Just follow some simple steps to import OLM to Office 365 account.
- Launch the downloaded and installed OLM to PST Converter application.
- Click on Browse option to add the OLM file. Use Find option if you don’t know the file location. It will search OLM files it the specified system drive. Add the file location and click on OK.
- The scanning and conversion process will get start. The file mailbox data in structured form will get retrieved shortly. Preview and select your desired choices for import and click on Save option.
- Now, choose Office 365 as the saving option, provide its login credentials and click on OK.
- The saving process will show progress and OLM data gets imported to Office 365 account safely.
Final Words
Instead of going for a multi-staged, risky manual process to import OLM to Office 365, selecting the most secured Best OLM to PST Converter tool would be the wise choice which happens to move OLM to Microsoft 365 in about 4-5 simple and direct steps.


I try this method earlier to import OLM files to Office 365 and you had to believe that it’s a very unique method. The author shared lots of tricks and steps to do this importation. Now I have shifted OLM files to Office 365. Thanks for describing this free manual method.
I found this manual solution very successful to import OLM files to Office 365. Cloud storage give me assurance of accessibility, safety and reliability. It gives me a very good experience and I wants to recommend this free solution for migration.
As blog heading says it was actually easy to import OLM files to Office 365 with this manual method. I do this solution as step directs me. With minimum effort I converting OLM file into Office 365 with all data of emails.
This blog provides such a useful information about OLM file to Office 365 conversion. It guide me at every step of the process. Thanks for sharing.
I was thinking to migrate my Outlook for Mac email data to cloud based email application like Office 365. But the manual process looked complicated and lengthy (combination of 3 steps). So I used third party tool and migrated my all emails to Office 365 in few clicks. Thank you sharing this amazing OLM converter tool.
I tried configuring Gmail account for Outlook for Mac and then move mailbox data into Office 365 mailboxes with ease, this whole process really worked very smoothly for me, I just followed the instruction as mentioned above. Thanks a lot.
Definitely an amazing blog, Really worked for me. I just followed the step by step manual instructions which are given above. Thanks for this great and helpful blog, keep it up.
After a lot of web browsing, finally I found this awesome blog. It helps me a lot to migrate my precious data to Office 365 mailboxes. This manual solution is very easy to apply due to its detailed description in the blog. Keep it up.