Offline Storage Table (OST file) needs not to be backed up as Exchange creates a new updated copy at its location every time it is configured. However, with growing drive storage due to very large OST file, efforts can be made to move the OST file to another drive location in order to resolve the storage issue.
Note: OST files cannot be used directly on another computer system by copying/pasting it at new system folder location as it requires the same Exchange Server configuration which created the file.
Why we need to move offline Outlook Data File (OST) in Outlook 2019/2016/2013?
- Shifting from one organization to another
- Shifting from one OS environment to another
- Running out of disk space with big-sized OST files
- Data accessibility in disastrous situations
- Preventing data loss when Exchange Server crash down
3 Ways to Move Offline Outlook Data File
We would describe the methods which users can adopt to transfer/move Offline Outlook Data File (OST) data from one location to another in the following section.
- Setting OST file location with ForceOSTPath Key
- Moving OST file with new file creation
- Moving OST file through conversion
Setting OST file location with ForceOSTPath key
ForceOSTPath key is a windows registry key works for a new Outlook profile and supported by latest Outlook versions. With modification in this key, a user can set new location for the OST file on the system. Microsoft Outlook application must be closed before running this method. Let us see the procedural steps:
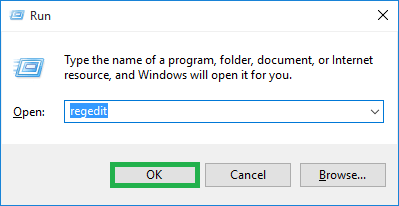
- Press Windows+R and type regedit. Press Enter. The Registry Editor page will get open.
- Follow the path:
HKEY_CURRENT_USER\Software\Microsoft\Office\xx.0\Outlook
Note: This xx value changes for each Outlook version.
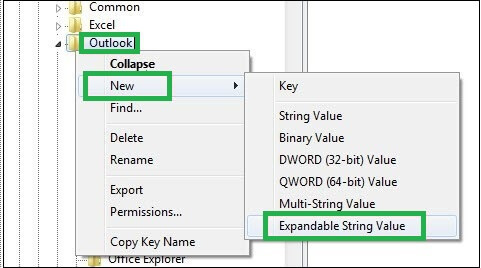
- Now right-click on the Outlook option, select New and then click on Expandable String Value option.
- Type ForceOSTPath as name and press Enter to create it.
- Now right-click on ForceOSTPath and click on Modify option.
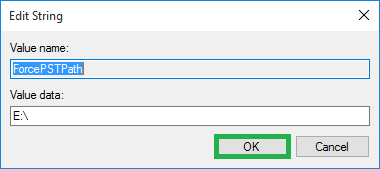
- In the Edit String dialogue box, provide the path location for saving the OST file against Value Data option. Click on OK.
- Exit the Registry Editor page and open Outlook application.
- Now, confirm that the OST file location is changed or not.
Review: This method requires careful execution of every step and also holds good chances of data loss or corruption while performing the steps incorrectly. It moves the Offline OST file to another location on the same system.
Moving OST file with new file creation
OST file default location can be found at either of the following provided paths:
C:\Documents and Settings\Local Settings\Application Data\Microsoft\Outlook
Creating new OST file by disabling and re-enabling cached mode at a different location would cause data migration automatically as with the Exchange Server configuration, all data would move to this newly created OST file. Let us understand the process more clearly using the given steps.
- Run your Outlook application. Navigate File > Account Settings > Account Settings > Data Files.
- Select the Exchange account and click on Settings option.
- Now, move to the Advanced tab, deselect Use Cached Exchange Mode and click on OK.
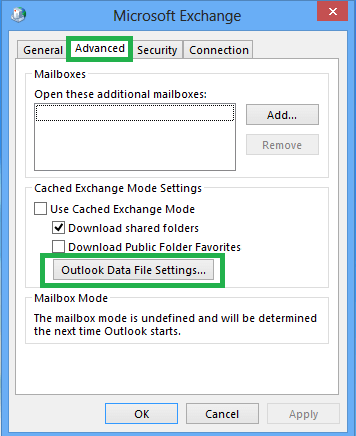
- Now, click on Outlook Data File Settings option and click on Disable Offline Use option. Confirm it by clicking on Yes.
- Now, click on Outlook Data File Settings and choose either option I want to create a file (default) or I want to move the old file. In first option, browse and add the folder path where new OST file would be saved and in the second option, browse the OST file path which you had moved to a new location. Here, we are going with the first option. After adding the folder location, click on Open. Click on OK.
- Again, reach the Advanced tab and select the checkbox saying Use Cached Exchange Mode. Click on OK.
- A prompt message will appear asking to restart the Outlook application. Click OK.
- The new OST file will be created at the new specified location on the system. You can delete old OST file from the previous location.
Review: The method works for latest Outlook versions – 2010 and above only. It needs technical expertise to perform the process smoothly. The data is not guaranteed security and it does not help when Exchange is under maintenance or got crashed. Also, the OST movement is to the same system location only. So, the OST file can be moved to other system only after its conversion to PST file format.
Moving Offline Outlook Data File through Conversion (Automated)
There could be a case where the Exchange Server is undergoing long term maintenance or has got crashed and thus unavailable, but its mailboxes data is required by the user. Also, for some reasons, OST data could be required in another system as well. All these scenarios point to the one and only solution which is converting OST file to PST file format.
Though there is a manual way where using the Import Export feature of Outlook, users can move OST file items to PST file but it is a long process and moves a single mailbox folder at a time. It moves only healthy OST file data, do not show preview of the content to be migrated and also holds great chances of data and properties loss during the export. Thus, it cannot be considered as a reliable way.
The best third-party software that is recommendable here is the OST to PST tool. It swiftly converts healthy/corrupted OST files into PST files. without the need of Outlook and its configuration with the Exchange Server. Various filters and preview feature allows users to move only what is required. The data authenticity is well maintained along with its structural properties. The OST file is moved securely, accurately and efficiently to the PST file on the system and can be later on easily moved to another system using external devices.
Now think and try the best solution to move Offline Outlook Data File (OST) in Outlook.
Conclusion
OST file needs to be relocated or moved due for the data management and other requirements. There are manual solutions like Windows Outlook Registry key modification, creating new OST file and moving Offline Outlook Data File by converting it to PST file format for users to perform and satisfy their needs. For more comfortable OST data transfer, a smart third-part Best OST to PST Converter software is also provided.

These manual methods help me move my OST data into the Outlook 2016 version. The blog has described all methods in a way that any user can understand. This blog also provides complete information about the conversion in a simple way. Thanks for sharing this informative blog.
I used Outlook as an email client for various email communications and due to this my drive storage becomes full. To prevent OST data from loss I applied this method for securing OST files. This method helped really well to do this task. Thanks for providing this blog method.
These manual ways are so helpful in the conversion of offline OST file into Outlook 2016 PST format. With this I transferred OST files with all mailbox details into PST without any error. This blog is a full package of information which describes every detail in simple words.
I shifted OST file from old Operating System to new and given method helped me in this. Every step described so well, I easily understand and applied it. The team did good work, I appreciate this solution.
Because of many reasons I shifted my OST file to another Outlook version. In the whole conversion process this method supports me. If I say in one word, it is “brilliant”.
I wanted to convert OST file in PST format to prevent file damage due to Exchange server failure. To complete this work I follow the instruction the above methods and got PST files. Now I am as sure about my OST file safety.