The migration of mailboxes and other Exchange resources to the online environment makes the existing Exchange Servers redundant without any external or internal dependencies. In the same scenario, it has become obligatory to uninstall/decommission Exchange Server 2013 along with hybrid environment.
Decommissioning step by step guide for Other Exchange Server Versions
Decommission Exchange Server 2010
Decommission Exchange Server 2013
Decommission Exchange Server 2016
Decommission Exchange Server After Office 365 Migration
Steps for Uninstalling/Decommissioning Exchange Server 2013
- Supplanting Hybrid Configuration: To remove the hybrid configuration, the user has to run the shell command – “Remove-Hybrid Configuration” on the on-premises Exchange Server. However, the use of Exchange Management Shell command is not enough as it does not removes the objects created at the time of hybrid setup.
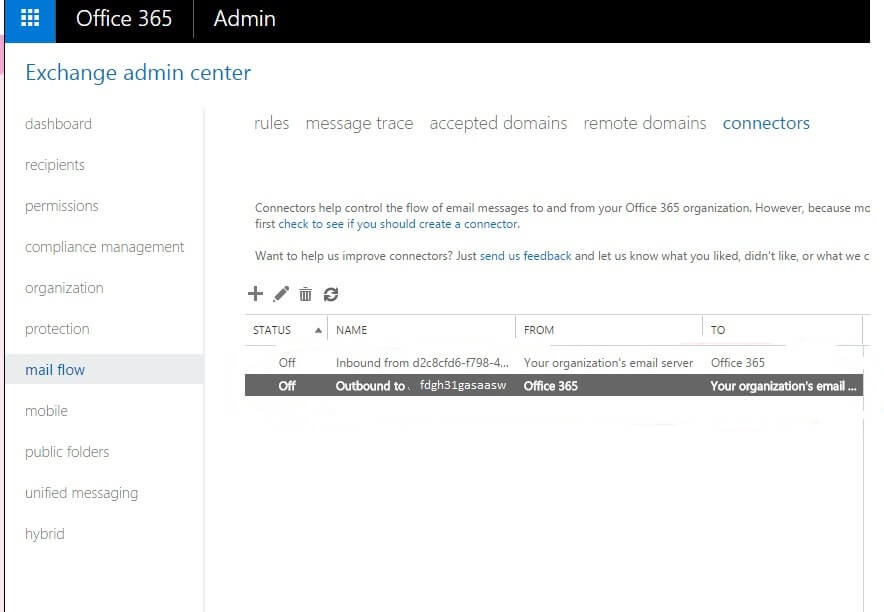
- Manually supplanting of Hybrid Connectors: Prior initiating the process to remove the connectors, ensure that no other domains are used to relay the mail between Microsoft 365 and on-premises. If there are no dependencies, then remove the send connectors (Source Transport Services) as shown in figure.

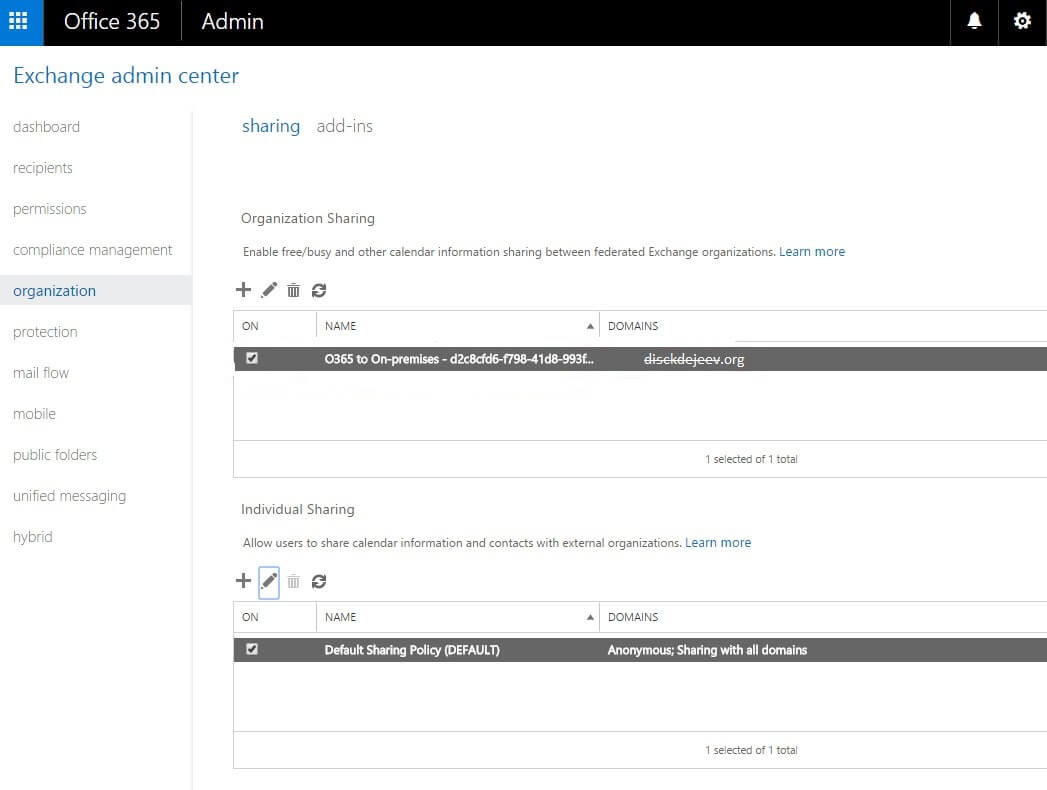
Figure 1 Removing Connectors - Manual Removal of Organizational Sharing: Organizational sharing rules must be removed for free/busy calendar sharing between on-premises and Microsoft 365. Thus, all the settings must be removed.

Figure 2 Resetting Organizational Sharing - Clearing Mailbox Database: The unused mailbox database must be cleared off. For this, the user has to check for the database which is mounted, holding and working in the mailboxes. The removal of unused database is important because initially if it had not been removed, then it would be possibly difficult to remove later.
With command “Get-Mailboxdatabase:fl edbfilepath” and “Get-Mailboxdatabase|Remove-mailboxdatabase” the mailbox can be cleared.

Figure 3 Clearing Mailbox Database - Disabling Arbitration Mailbox: To disable the arbitration mailbox, user must know about the number of arbitration mailboxes residing in the default mailboxes. With the command line: Get-Mailbox -Arbitration -Database <5. Database Name>, the user can fetch this information. Moreover, to delete the arbitration mailboxes, the following command line can be executed: Get-Mailbox -Arbitration -Database <5. Database Name> | Disable-Mailbox -Arbitration –DisableLastArbitrationMailboxAllowed

Figure 4 Disabling Arbitration Mailboxes - Eliminating database of Default Mailbox: To disable the concerned Exchange Server, it is necessary to empty up some space from the database of the default mailbox. To delete the dataset from the mailbox, the command line: “Get-MailboxDatabase | Remove-MailboxDatabase” can be used.

Figure 5 Deleting database from Mailboxes.
The process may complete uninterruptedly; however, due to replication failure in active directory an error message may appear. - Remove messages for Queue: To complete the process of Exchange Server decommissioning or uninstallation, it is necessary to delete all the messages lying in the queue. To perform this deletion, the user has to enter the following command: “Get-Message : Remove-Message”

Figure 6 Deleting messages lying in queue. - Disable Third-Party Services & Remove DAG Membership from Exchange 2013: To remove DAG membership from Exchange, open the Exchange Admin Center and follow servers>Database Availability Groups. Now, select the DAG name and click on the Manage DAG Membership icon. On the next opened wizard, select the Remove option to remove it manually. Finally click the Save option. Or you can run the following command in the Exchange Management Shell to perform the same.
[PS] C:\>Remove-DatabaseAvailabilityGroupServer -Identity <DAG name> -MailboxServer <mailbox server name>
- Uninstalling Exchange: This is the final step in Exchange Server un-installation. Initiate the un-installation process from ‘Add/Remove’ program from the Control Panel. Once the un-installation process is complete, reboot the system.

Figure 7 Exchange Server 2013 Decommission/Un-installation.
The manual process of Exchange Server 2013 Decommission or un-installation is an onerous process for the users who have never attempted such installation. On initiating the un-installation process without knowledge of the domain may lead to irreversible loss especially where the database is concerned. Therefore, if the user does not have any knowledge of the Exchange Server 2013 Decommission/Un-installation, then it is recommended to take an assistance of the Exchange Recovery tool which has been designed keeping in mind the obvious issues faced by the user.
Conclusion
The manual procedure of decommissioning the Exchange Server 2013 version is well explained in this blog along with the screen displays for the users. The process seems quite technical, so need good expertise in the field and the respective Exchange Server environment knowledge. Third-party Exchange Migration tools play important role as the alternative in such situation.


I am really happy to found these methods of decommissioning Exchange Server 2013. Free methods are easy and reliable on their job and I am trusting these methods. Thanks for sharing.
I used to exchange server for email communication and it has obvious to concern about the storage issue because of long email attachments. In the process of creating space for new mails I decommissioned Exchange server 2013 with the above explained method. It is superb to work with these methods.
Because of some reasons I want to decommission Exchange server 2013, then I found this solution and seems very useful in decommissioning. The method elaborated in step by step process with all needed information.
Decommissioning Exchange server 2013 is not an easy task. Above method makes this complex process easier by guiding manual steps. Appreciate a lot.
After a long time as an Exchange server user I also get troubles related to storage. This blog provided me information about decommission of Exchange server 2013 and easily solved my problems.