Data Repair Tools Products Offers Contact menu
Data Repair Tools Article | Fix OST Synchronization Error When Connecting with Exchange Server

Table of Content

Fix OST Synchronization Error When Connecting with Exchange Server

Email | 4 min read| Brayden Mitchell | Updated On - April 1, 2023

OST file being the core of your Outlook helps in storing and synchronizing all data with Exchange database. With OST file, one can work offline if there is no possibility of connecting to Exchanger Server. OST file gets automatically synchronized so all your offline work will be updated once the connection to Exchange Server is established properly.

However, at time it has been found that when you open MS Outlook and try to synchronize it with your Exchange mailbox you are restricted from doing so and hence encounters various OST synchronization error messages shown in the synchronization log in the Deleted Items Folder. Such kind of synchronization problem occurs when your one or more email messages in the OST folder are corrupted or damaged and cannot be repaired during synchronization process.

Methods to Fix OST Synchronization Error

Here we are ascertaining methods which could be followed to overcome this problem. By properly following them you will be able to properly synchronize your Exchange mailbox.
  • Use Inbox Repair Tool: The first and foremost thing which could be done once you encounter any problem in Outlook is running Inbox Repair Tool which is Microsoft’s inbuilt utility. The tool helps in repairing any of your corrupted Outlook file with scanpst.exe and scanost.exe for both PST and OST files.
  • Check your synchronization process: You can check whether your OST files are properly synchronized with Exchange or not by going to the Offline folder and then clicking on its Properties. Here under synchronization tab you will get all the necessary details about when your last synchronization process took place. If there is different value in Server Folder and Offline Folder, then it is not synchronized properly. To Fix OST Synchronization Error, the synchronization process can be initiated as follows:
    1. Select the Outlook folder to be synchronized
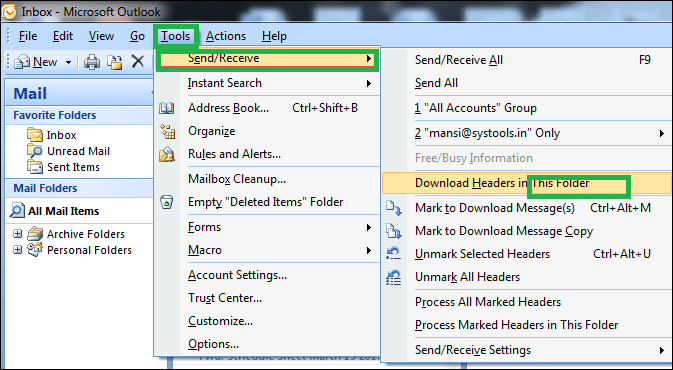
    2. From the menu bar click ‘Tools‘ followed by ‘Send/Receive‘. From ‘Send/Receive‘ click ‘Download Headers in this Folder
      From ‘Send/Receive‘ click ‘Download Headers in this Folder‘
      This is the manual process of Outlook-Exchange synchronization. If it doesn’t work, then try automatic sync method.
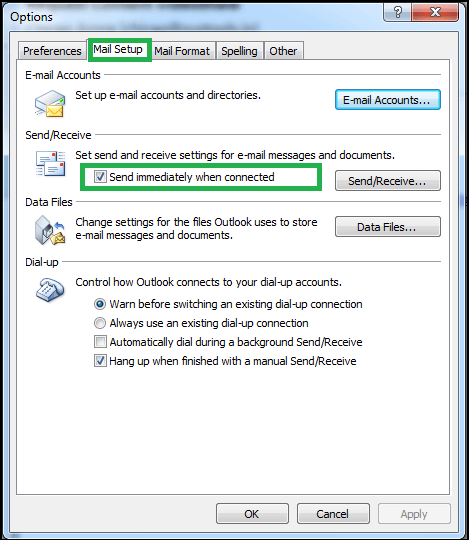
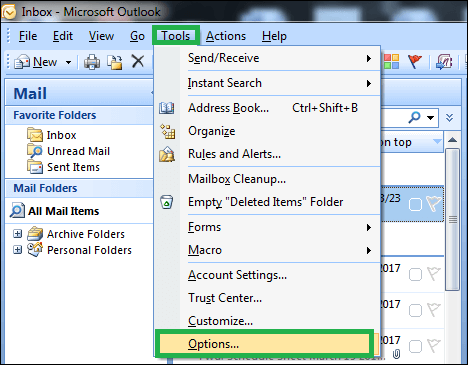
    3. From menu bar choose ‘Tools‘. Click ‘Tools‘ and choose Options >>Mail Setup tab.
      choose Options >>Mail Setup tab
    4. Go to ‘Send/Receive‘ and check the ‘Send immediately when connected‘ option
      check the ‘Send immediately when connected‘ option
  • Enable Use Cached Exchange Mode: Ensure that your Use Cached Exchange Mode checkbox is enabled by following these steps:
  • Manually synchronize OST file with Exchange: Click on Send/Receive button to synchronize your all folders. You can also synchronize a particular folder by selecting ‘This folder’ option instead of all.

For Outlook 2003 users

  1. Go to the Tools menu of Outlook. Select Email accounts under it
  2. Here click on the option of ‘View or change existing email accounts’. Click Next
  3. After a list of containing email account linked to your Outlook profile appears, click on Microsoft Exchange Server and then click on Change
  4. A checkbox Use Cached Exchange Mode will appear. Enable it and click Next
  5. Click on ‘Finish’. Restart your Outlook

For Outlook 2007 and 2010 users

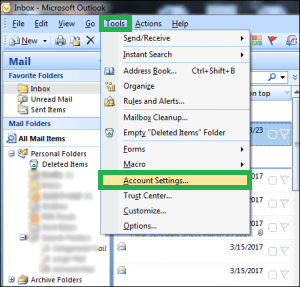
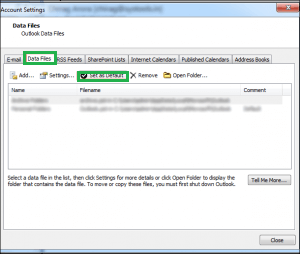
  1. Go to the Tools menu and click on Account Settings. Under it click on Data Files tab
    click on Account Settings.
  2. Check that Mailbox account name contains a default value
  3. Now go to Email tab and select Mailbox account name. Here click on Settings
    Select Mailbox account name
  4. Under Advanced tab option a checkbox Use Cached Exchange Mode will appear, enable it
  5. Close the Account Settings and restart Outlook

A simple method to remove this OST synchronization error can also be followed

  • Search for the OST file which is creating problem and use OST to PST tool which scans the corrupted OST file, recover the data from it and saves it in PST format
  • Keep a copy of your original OST file for any kind of emergency
  • Now delete or rename the original OST file
  • Send or receive mails through your corresponding Exchange mailbox which will let Outlook create new OST file
  • In case the new OST file also not works properly, then there might be the problem in your Outlook profile. Create a new Outlook profile in such situation
  • Now copy the content of the PST file created by the tool to the newly created PST file

3 thoughts on “Fix OST Synchronization Error When Connecting with Exchange Server”

  1. I encountered this OST synchronization issue while connecting to an Exchange server, and then I used the suggested methods to resolve the error. Thank you for sharing this useful information.

  2. I was searching for a solution to fix this OST synchronisation issue, and then my friend suggested I read this article. I used the above-mentioned methods, which are well explained and helped me to fix this issue. I appreciate the team’s efforts to create and share this informative article.

  3. I faced Outlook Synchronization Issues and then I found this amazing blog in Google search which helped me to fix the issue. It was due to OST file size and network connection issue. Now my Outlook is working fine.

Leave a Reply

Your email address will not be published. Required fields are marked *

78  +    =  84

© Copyright 2015 - 2024 by Data Repair Tools. All Rights Reserved.
All designated trademarks and brands are the property of their respective owner
DMCA-Protected